Thursday, August 25, 2011

I Don't know What This Is, so I'm Going to Eat It

There's a philosophy that applies equally well to me & my recipes as to toddlers & their boogers. NOM.

Tagliatelle with Prosciutto and Orange
This one is valuable more for the technique than the taste (although that too, is very good). Instead of crafting the noodles and sauce separately, you combine them in a skillet shortly before the pasta is al dente. In a sense, the sauce gets cooked in, flavouring each individual noodle and bringing the dish together much better than you could otherwise. Also, it takes literally no time at all; it's effortless deliciousness, no matter what you throw in the sauce. You could simply add pepper and cheese, and it would be to die for.

If you knew this trick already, good for you. If you don't, congratulations, you will never think of pasta dishes the same way again.

ps. homemade pasta rocks
  • salt
  • 12oz egg tagliatelle or fettuccine (preferably fresh)
  • 2 Tbs (1/4 stick) butter
  • 2oz thinly sliced prosciutto, torn into 1-inch pieces
  • zest and juice of 1 orange
  • 1/2 cup heavy whipping cream
  • freshly-ground black pepper
  • 1/4 cup finely grated parmesan
Bring a large pot of water to a boil. Season with salt; add pasta and cook, stirring occasionally, until 1min before al dente (about 2min for fresh pasta, longer for dried). Drain, reserving 1/4 cup pasta water.

Meanwhile, melt butter in a large heavy nonstick skillet over medium-high heat. Add prosciutto; sauté until browned, about 3min

Add reserved pasta water, orange juice, half of zest, and cream; bring to a boil. Add pasta; cook, stirring, until sauce coasts pasta and pasta is al dente, about 1min. Season with salt and pepper. Stir in cheese and divide among warm bowls.


Penne with Chocolate, Pistachios, and Goat Cheese
Ok, read this recipe. Right now, just read it. You will probably have the same reaction I did, namely: "...what? what? What the ...what?!" And so on. In my world, such a reaction to a recipe entails cooking it as soon as possible. I mean, come on! You boil your penne in wine, and then smother it in cheese and chocolate! How could you not want to eat that?

The dish works surprisingly well. Disparate flavours meld together to form an elusive yet elaborate taste that left me staring dumbly into my bowl. The catch is that it's very creamy -- so much so that you can't eat more than a medium-small serving before you simply get sick of the texture. Overall, I would qualify this as an unexpectedly impressive dish, but one better suited to fancy dinner parties. All chocolate dinner, anyone?
  • 2 Tbs olive oil
  • 1 small white onion, finely chopped
  • 12oz penne
  • 4 cups (1 liter) dry white wine
  • 2 Tbs milk
  • 1 Tbs salt
  • 1/2 cup shelled pistachios
  • 3oz white chocolate
  • 4oz mascarpone cheese
  • 2oz fresh creamy goat cheese
  • 2 Tbs milk
  • 3oz bittersweet chocolate, finely grated // waaay too much. Try 1/2oz
Heat the oil in a small saupan and sauté the onion until just transparent; do not let it color. Add the penne and stir well over medium heat for 2min. (Note: no, I have no idea why we're sautee-ing raw pasta with the onion. Suspect you could skip this.) Pour in the wine and milk and season with salt. Bring to a boil and simmer until cooked al dente.

Chop the pistachios coarsely in a food processor. Place the white chocolate in a double boiler over barely simmering water and stir until melted. Remove from the heat and stir in the mascarpone, goat cheese, and milk. Drain the penne and place in a heated serving bowl. Pour the chocolate sauce over the top and sprinkle with the chopped pistachios. Toss well. Serve hot with the grated dark chocolate sprinkled over the top.

Monday, August 8, 2011

Celebrating Anonymity (with pie!)

Several weeks ago, I was tapped to take part of a collaborative project between my University's IT dept and the local art museum. In less than a month, we needed to plan, design, and implement some way to present interactive multimedia within their upcoming exhibit on the human form. That, by the way, is a very short and hard deadline to create something completely original, with no amount of previous experience.

After going through designs, initial builds, tests, snafus, bugs, rebuilds, and many cries for help to other departments, everything was up and running on time. I was particularly pleased with the product, given that I played an unusually central role in the project. From research to implementation, and following through with testing and monitoring, I feel like I did the bulk of this project's heavy lifting.

And today, there is recognition! The main news feature on the University's central website is devoted to my project! "Smart exhibit blends art and technology", it reads, "Organizers of Go Figure use touch-screen technology to engage visitors, tell artists’ stories." Organizers...? The article tastefully recounts what moved the exhibit's curator to create the videos, and how my boss was inspired to lead this innovative collaboration. It goes on to chronicle how their boundary-breaking brainchild elucidates the deeper meaning of the works to the average museum goer, granting each a discreet view into the artists' respective thoughts. The two of them felt very privileged to have been part of such a landmark work, and both see many opportunities for this sort of partnership in the future.

I think I might even be mentioned in there. Somewhere. Possibly the phrase "...and others" refers to me. Maybe.

Far be it from me to feel slighted, though! Rather, I am tacitly amused. And I won't deny that they deserve a good helping of credit for what was, despite my ironic posturing, a pretty cool project. But I'm going to extend thanks to some the poor plebes who don't have enough of a title to be publicly recognized: yours truly, for one, who built the thing from ground-up from little more than a photoshop design (and we'll just gloss over the amount of redesigning & debugging it required); one of my department's designers, for creating said design; the University's mobile iOS developer, who originally constructed the pseudo-browser app that we used as a platform to present the media; and finally, the Smart Museum's videographer, who filmed & edited all 19 videos currently on display, side-by-side with the art pieces. These must be thankless jobs: I worked with all of them, and even I don't know all of their names.

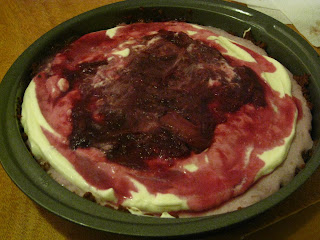
So well done, mates. Have some pie. Some crazy pie for a crazy good job on a crazy project.

This pie brought to you courtesy of Bon Appetit's August edition. And let me just say, you should go eat some immediately. It's divine.

Rhubarb-Gingersnap Icebox Pie

for the crust:
  • nonstick vegetable oil spray
  • 1 cup ground gingersnap cookies (20-30 cookies, depending on brand, ground in a food processor)
  • 2 Tbs sugar
  • 1/4 tsp salt
  • 1/8 tsp nutmeg
  • 1/4 cup (1/2 stick) butter, melted
for the rhubarb compote:
  • 1 cup fruity red wine, such as Shiraz
  • 3/4 cups sugar
  • 3/4 lbs fresh rhubarb, (or frozen rhubarb, thawed,) cut lengthwise into 1/3-inch slices, then crosswise into 1,1/2-inch-long pieces (about 3 cups)
to assemble:
  • 1 quart good-quality vanilla ice cream
  • 1/4 cup chilled heavy cream
  • 1/4 cup crème fraîche or sour cream
  • 1 Tbs sugar

Crust
Preheat the over to 325 degrees. Coat a 9-inch glass or metal pie pan with nonstick spray.

Process cookie crumbs, sugar, salt, and nutmeg in a good processor until well incorporated. Transfer mixture to a medium bowl and drizzle butter over; stir to blend. Pour into prepared dish. Use bottom and sides of a measuring cup to pack crumbs onto bottom and up sides of dish. Bake until crust is deep golden brown, about 12min. Let cool on a wire rack and set aside.

Compote
Brine wine, sugar, and 1/2 cup water to a boil in a wide pot, stirring to dissolve sugar. Reduce heat to medium and simmer, stirring often, until syrup measures 1 cup, 10-12min. Add rhubarb, increase heat to high, and cook, without stirring and swirling pan occasionally, until compote thickens and syrup is slightly reduced, 4-5min. Slide onto a plate, keeping rhubarb intact. Freeze for 10min to chill quickly.

Assembly
Chill bowl and paddle attachment of a stand mixer (ie: a spatula) in freezer. Soften ice cream in the refrigerator for 20min. Spoon ice cream into the chilled bowl and beat with paddle attachment on low speed until smooth. Set 1/3 cup compote aside; add remaining compote to ice cream and mix until evenly incorporated. Spoon the ice cream into cooled crust; smooth top. Freeze until firm, about 2 hours.

Whip cream, crème fraîche, and sugar in a small bowl just until peaks form. Spoon into center of pie; spread evenly, leaving a 1-inch plain border. Spoon remaining compote onto center of cream. Freeze until firm, about 1 hour and up to 8 hours. Let pie stand at room temperature for 10min before serving.

Tuesday, July 19, 2011

Just Because Lee Asked...

Here's the recipe for a cake I made along with the grape & wine pasta. It reminds me a lot of Crans Cake, playing on a similar nut & cream theme. The downside: pistachios are time-consuming to shell and blanch. And by the way, since the frosting is mostly butter (I'm really not kidding), be sure that the cake is completely cool before you try to spread it, else it will simply melt and dribble off. I mean completely cool. I ended up putting mine in the freezer for a few minutes.

Sicilian Pistachio Cake
for the batter:
  • 2 large eggs
  • 2/3 cup sour cream, divided
  • 1/2 tsp vanilla extract
  • 1/2 tsp almond extract
  • 1/3 cup blanched pistachios
  • 1 cup sugar
  • 2 cups flour
  • 1/2 tsp baking powder
  • 1/2 tsp baking soda
  • 1/2 tsp salt
  • 1,1/2 sticks (12 Tbs) butter
for the buttercream:
  • 3 large eggs yolks
  • 1/4 cup plus 2 Tbs sugar
  • 1/4 cup light corn syrup
  • 1 tsp lemon juice
  • 2 sticks butter
  • 1 tsp vanilla extract
  • 3 drops pistachio essence (optional) // because everybody has that in their pantry, right?
  • 1/2 cup plus 1 Tbs blanched pistachio nuts, slivered or coarsely chopped

The Cake
Set an oven rack in the lower third of the oven and preheat to 350 degrees. Coat a 9-by-2-inch round cake pan with butter and flour.

In a small bowl, whisk the eggs, 3 Tbs of the sour cream, the vanilla, and almond extract, just until lightly combined.

In a food processor, process the pistachios with the sugar until finely ground but not to a powder.

In a large bowl, mix the flour, the pistachio mixture, the baking powder, baking soda, and salt on low speed for 30sec. Add the butter and the remaining sour cream. Mix on low speed until the dry ingredients are moistened. Raise the speed to medium and beat for 1,1/2min. Scrape down the sides of the bowl.

Gradually add the egg mixture in two parts, beating for 30sec after each addition to incorporate the ingredients and strengthen their structure. Using a spatula, scrape the batter into the prepared pan and smooth the surface evenly.

Bake for 35-45min, until a knife inserted in the center comes out clean. Let the cake cool in the pan for 10min before removing the pan and allowing it to cool completely.

The Buttercream
In a medium bowl, mix the yolks until light in color.

In a small saucepan, preferably nonstick, combine the sugar, syrup, and lemon juice. Using a spatula, stir until all the sugar is moistened. Heat over medium-high heat, stirring constantly, until the sugar dissolves and the syrup begins to boil around the edges. Stop stirring and continue cooking for a few minutes, until the syrup comes to a rolling boil (the entire surface will be covered with large bubbles). Immediately transfer the syrup to a heatproof glass measure (or ceramic bowl) to stop the cooking.

Beat the syrup into the yolks in a steady stream. Continue beating for 5min. Let cool completely. To speed cooling, place the bowl in the refrigerator, stirring occasionally.

When cool, beat in the butter 1 Tbs at a time. The buttercream will not thicken until almost all of the butter has been added. Add the vanilla and pistachio essence (if using), and beat until incorporated.

Use the buttercream at once. Otherwise, place in an airtight container and use up to 4hrs later. If you are keeping it longer, refrigerate it and bring it to room temperature before using.

The Presentation
When the cake is completely cool, frost the top and sides with swirls of buttercream. Coat the top and sides with the slivered or chopped pistachios.

Sunday, July 17, 2011

Food for a Bad Week

I have spent the past week engulfed in melancholy.

Backstory: I was in New York last weekend, visiting friends from college -- you know, the important ones: those who make much of college worthwhile. It was glorious and exhausting and I relished every instant with a profound joy. The trip was touched with a bit of sadness, though; I learned that most of them are... (how to put this delicately?)... not in the best of places right now. Being the nosy nice guy that I am, I want to step in and help, changing the world so that they can have an easier time of it. That's simply not possible, of course, and it infuriates me. As a result, I have spent all my time since then brooding, frustrated and morose.

My mood deteriorated even further when I saw the state of the kitchen upon my return. Not only did it have the usual filthy characteristics that I hate (recycling: overflowed; sink: full of dishes; all surfaces: encrusted with grime), but furthermore, the dishwasher was broken! I realise that as students, we are incredibly spoiled to have this machine. But it is of little use when it refuses to use water. Disgusted, I withdrew to (read: hid in) my room for a few days.

Passive aggressive? Maybe. But you know things are bad in this apartment when I refuse to cook, especially since I'm the one who suffers most from that decision. I get antsy and irritable (if I'm not already) when I can't create anything.

Fortunately, the weekend has witnessed an upturn of sorts. Melancholy has given way to grim determination, somehow fueled by the memory of joy. I've managed to spend a few hours cleaning and running errands, and the dishwasher has reconciled itself with water. Life is getting tolerable again. I haven't made a difference in New York yet; that's next on my To-Do list. Me vs. the Universe. Yeah. Let's do this.

In the meantime, to keep myself distracted and celebrate the returned-to-functional kitchen, I continue to make interesting things. This here is a fascinating pasta dish that I once made a while ago, but didn't blog about it for some reason. If the mix of red wine, grapes, and Italian sausage doesn't grab your interest already, then think about the taste when the grapes macerate in the wine for 8 hours, along with sugar and vinegar. Hard to imagine, isn't it? Take it from me: the result is a delightful mix of sweetness from the fruit, bitterness from the vinegar, and spice from the sausage. And don't be intimidated by the wait; after the overnight maceration, the rest of dish assembles very quickly.


Strozzapreti with Sausage, Grapes, and Red Wine
  • 1 cup seedless red grapes, cut in half lengthwise
  • 1 cup dry red wine
  • 1/4 cup sugar
  • 2 Tbs red wine vinegar
  • 1 lb dried strozzapreti pasta // or whatever type of pasta you happen to have on hand
  • 3 Tbs olive oil
  • 1,1/2 lbs Italian sausage (about 4 links, recommended 2 spicy and 2 sweet), casings cut away and meat roughly chopped
  • 1 medium onion, chopped (about 1 cup)
  • 10 sage leaves
  • 2 Tbs butter
  • 1/2 cup grated pecorino cheese, plus extra for sprinkling
  • 1/2 tsp black pepper
  • 1 Tbs chopped parsley
Day 1:
Combine the grapes, wine, sugar, and vinegar in an airtight container, and store in the fridge so that the grapes macerate for at least 8 hours or overnight.

Day 2:
Put a large pot of salted water on to boil for the pasta.

Remove the grape mixture from the fridge, place it in a medium saucepot, and bring it up to a boil over high heat. Cook the mixture at a boil until the liquid has reduced by half, about 10min.

When the pasta water comes to a boil, add the strozzapreti and cook until the pasta is just al dente.

Heat the olive oil in a large pot over medium heat. Add the meat and begin to brown it for about 3-4min, stirring and breaking up the meat as you go.

Add the onion and continue cooking, stirring well, until the sausage and onion have cooked through, about 5-7min.

Add the sage and stir to combine.

Add the grape mixture and stir well.

When the pasta is cooked, drain it (but do not rinse it). Add the pasta to the pot with the grape-and-sausage mixture and cook together so the flavours combine and the pasta cooks a bit more, about 1,1/2min.

Remove the saucepot from the heat and add the butter, cheese, black pepper, and parsley. Sprinkle with more cheese and serve immediately.

Monday, July 4, 2011

Fancy Frozen Desserts

Falko continues to taunt me. I respond in kind.

Semifreddo
Shamefully, I had never heard of semifreddo before. The Italian concoction (it translates to 'semi-cold'), I am told, is usually made with a mix of gelato and whipped cream, presented as a frozen cake or custard. I'm sure they must get pretty fancy. The one that I found doesn't call for gelato (thankfully), requiring instead simply your own eggs, sugar, and cream. As an added bonus, it is triple-layered; each third composes a radically different (and very accurate) taste. The first gives you a base of green pistachio cream, followed by a pink strawberry layer, and topped with a pure and simple vanilla flavour.

The technique is pretty straightforward in theory, being essentially three parallel processes occurring at the same time. First, you extract the essence of the flavours into milk, then you add beaten eggs and sugar to each, then to you add whipped cream to each, and assemble. It does eventually become time consuming when you have to wait for everything to chill or freeze, though, so it would probably be best to make this long ahead (up to 3 days) of when you intend to serve it.

Serving tips: though you can scoop it out of the loaf pan, I recommend turning it out on a platter and slicing it with a hot knife. It's very presentable, and you get a better cross-section (literally) of the different flavours. It does mean you'll probably have to eat most of it in one sitting, but I doubt many would mind that.

  • 1 cup shelled unsalted pistachios
  • 4 Tbsp sugar, divided, plus 1/2 cup
  • 1 cup whole milk, divided
  • 1/4 tsp almond extract
  • 1 vanilla bean, halved lengthwise
  • 1 cup fresh strawberries (about 4oz), hulled, halved
  • 1 tsp vanilla extract
  • 2 large eggs, at room temperature
  • 1/4 tsp salt
  • 1,1/3 cups chilled heavy whipping cream
Line a metal loaf pan (approximately 9*5*3-inches) with 2 layers of plastic wrap, leaving generous overhang on all sides.

Grind pistachios and 2 Tbs sugar in a food processor until very finely chopped. Transfer pistachio mixture to a small saucepan. Add 1/2 cup milk; bring to a boil. Remove from heat, cover, and let steep for 20min. Set a fine-mesh strainer over a medium bowl; strain, discarding solids. Stir in almond extract; set pistachio mixture aside.

Place remaining 1/2 cup milk in a separate small saucepan. Scrape in seeds from vanilla bean; add bean and bring to a simmer. Remove from heat, cover, and let steep for 15min. Set a strainer over another medium bowl; strain, discarding solids, and chill vanilla mixture.

Purée strawberries and 2 Tbs sugar in a food processor until smooth. Set a fine-mesh strainer over another medium bowl; strain, pressing on solids to extract as much juice as possible. Discard solids. Stir in vanilla extract and set strawberry mixture aside.

Whisk eggs, salt, and remaining 1/2 cup sugar in a medium metal bowl. Set bowl over a medium saucepan of simmering water (do not allow bottom of bowl to touch water). Beat egg mixture at high speed until it triples in volume and an instant-read thermometer inserted into mixture registers 170 degrees, about 3min. Remove bowl from over water and continue beating until thick and cool, about 3min. Add one third of egg mixture to each of the pistachio, strawberry, and vanilla mixtures; fold each just to blend.

Beat cream in a large bowl until soft peaks form. Add on third of cream to each of the pistachio, strawberry, and vanilla mixtures; fold each just to blend. Cover vanilla and strawberry mixtures separately; chill. Pour pistachio mixture into pan; smooth top. Cover and freeze until firm, about 45min. Gently pour strawberry mixture over pistachio layer; smooth top. Freeze until firm, about 45min. Gently fold vanilla mixture to blend; pour over and smooth top. Freeze until firm, about 4hrs.


Ice Cream Bonbons
This is fancy and delicious, but before I talk about that, I have two issues with this dessert. First, I dislike the name "bonbon." Bonbon, to me, is the French word for candy -- just simple candy. Tootsie rolls and Hershey's chocolate are bonbons. But when the word is used in American English, it seems the height of presumption: "this thing is so good, we must give it a French name". An inaccurate French name. And frankly, the French are doing excellently well with their own desserts; they don't need this attributed to them.

My apologies. As you might have noticed, the adoption and misuse of foreign languages is a pet peeve of mine.

Secondly, the recipe is a bit of a cheat: it calls for ice cream as an ingredient. So I guess instead of being an alternative to homemade cream, it's more of a fancification of what you already have: a hardened chocolate shell with a center of ice cream and a sprinkling of rock salt. It's kind of complicated to make (you have to work fast), but well worth it if you want to turn store-bought ice cream into a fancy dessert. Besides, it's really tasty.

  • 10 oz extra-dark chocolate, finely chopped
  • 2 oz good-quality white chocolate from a bar, chopped
  • 1 cup finely crushed chocolate wafer cookies
  • 1 pint ice cream // I used mint; they recommend caramel, strawberry, chocolate, vanilla, or coffee
  • Flaky sea salt, for sprinkling
In a medium heatproof bowl set over a pan of simmering water, melt the dark and white chocolates together. Scrape into a smaller bowl and let cool slightly.

Put the crushed cookies on a small plate. Line 2 baking sheets with wax paper and place on in the freezer. Fill a cup with ice water.

Working very quickly, scoop a 1-Tbs-size scoop of ice cream, packing it tightly. Transfer it to the melted chocolate. Using a skewer, poke the rounded top of the ice cream and coat the ball in the chocolate. Lift the bonbon, allowing the excess chocolate to drip into the bowl. Dip the bottom of the bonbon in the cookie crumbs and set on the baking sheet. Sprinkle salt on top. Let stand for 10 seconds, then transfer the bonbon to the baking sheet in the freezer. Repeat to form the remaining bonbons; dip the ice cream scoop in the ice water between scoops. Freeze the bonbons until firm, 30min, then serve.

Thursday, June 30, 2011

Summer Salads

As I've explained before, I'm not comfortable with salads. Their apparent simplicity intimidates the daylights out of me. I just have no confidence that I can make it taste good -- ridiculous as that may seem. Which is why I was very surprised when I realised I had a craving for one a few days ago. But instead of simply throwing a bunch of greens together and drizzling it with a quick vinaigrette, I had to go and make a project out of it. Tsk. Just like me. I can't just eat something. I have to go and think about it. Higher education at work here, people.

Not that this is a bad thing by any stretch of the imagination. I probably should have more greens in my diet anyway, if USDA's new nutrition chart is anything to go by... Tangent: was anyone else completely dumbfounded that they didn't think to use a pie chart in the first place? And their recommendations are still difficult to interpret, since they evidently can't even center the design accurately. Moral of the story: if you need a statistics degree to figure out how to eat, USDA's doing it wrong.

Return from tangent: furthermore, that's the exact kind of meal that you would want to have during summer. Fresh, crisp greens with an acid tang; anything else would add to the lethargy you already experience from the heat. Now, personally, I don't think that a salad by itself it enough to constitute an entire meal. A potato salad or a chicken salad, sure. But just a salad? Isn't that kinda... limited?

A question to be explored at a later date. In order to satisfy my craving and food preferences, I uncovered these two recipes, which have temporarily turned the Salad to an accessible summer meal for me.

Chicken Cherry Salad
Obviously, the best way to make a salad more meaty is to add, well, meat. (Duh.) But this one goes a step further by also adding croutons and cherries. Vegetables, protein, starch, fruit -- boom! Full nutritional value in a single dish. I'm waiting for the government to pat me on the head like a good little drone.

Facetiousness aside, I did continue eating this for several days in a row, jealously hiding it from my roommates. It's not as crisp as I expected (maybe I didn't toast the bread fast enough?), but that didn't bother me. In fact, that would have distracted me from the soft texture of the cherries and chicken. The vinaigrette gives everything a pleasant bite (in nice contrast to the cherries' sweetness), especially if you let it all soak it in for a few minutes.

For the Chicken:
  • 6 (2,1/4 lbs) skin-on, bone-in chicken thighs
  • 1 Tbs vegetable oil
  • Salt and pepper
For the Salad:
  • 1/4 cup lemon juice
  • 3 tbs Dijon mustard
  • 3 Tbs dill, chopped
  • 2 Tbs honey
  • 1 garlic clove, minced
  • 1/4 cup olive oil
  • Salt and pepper
  • 4 thick slices rustic bread, crusts removed, torn into 3/4-inch pieces
  • 1 lb fresh cherries, stemmed, pitted, and lightly crushed
  • 3 heads butter lettuce, cored and turned into pieces
  • 4 radishes, thinly sliced
  • 1 Tbs chopped chives
Preheat the oven to 475, and heat oil in a large cast-iron or heavy nonstick skillet over high heat until hot but not smoking. Season chicken with salt and pepper. Nestle chicken in skillet, skin side down, and cook 2 minutes. Reduce heat to medium-high; continue cooking skin side down, occasionally rearranging chicken thighs and rotating pan to evenly distribute heat, until fat renders and skin is golden brown, about 12min.

Transfer skillet to oven and cook 13min more. Flip chicken; continue cooking until skin crisps and meat is cooked through, about 5min longer. Transfer to a plate; reserve the fat.

Whisk together the lemon juice, Dijon mustard, dill, honey, and garlic together in a small bowl. Gradually whisk in oil. Season to taste with salt and pepper. Stir; set aside. Remove the crispy chicken skin and tear into pieces. Do the same with the chicken meat; discard the bones.

Heat the chicken fat over medium heat. Add bread to skillet and toast, turning frequently, until golden and crisp, about 2min. Remove with a slotted spoon and drain on paper towels. Season with salt and pepper while still hot.

Place chicken meat in a large bowl. Add cherries, lettuce, radishes, and chives and drizzle with vinaigrette; toss to coat. Divide salad among plates and garnish with croutons and chicken skin.


Celery, Grape, and Mushroom Salad
Another good way to add meatiness to a dish (minus the meat)? Mushrooms! This is a doubly good recipe for summer because it calls for a grill -- not only for the mushrooms, mind you, but for the grapes as well. What an awesome way to add smokiness to an otherwise fresh and nutty dish! At least, so I imagine. I don't have a grill, so I rely on my broiler. It still tastes excellent, but I will definitely have to make it again when I have earned that essential step on the path to adulthood. NB: if you happen to have unlocked this life achievement already, please make this in its original form and tell me what it's like!

Also, if you want to prove yourself a dork, place the oyster mushrooms on your face and pretend that you're Cthulu.

(...yes, I do such things.)

  • 2 Tbs white wine vinegar
  • 2 tsp lemon juice
  • 1/2 tsp celery seeds
  • 1/4 tsp Dijon mustard
  • 2 small garlic cloves, minced
  • 1/2 cup plus 1 Tbs olive oil (plus more for brushing)
  • 1/4 cup almond oil
  • Salt and pepper
  • 1/2 cup parsley leaves
  • 1/2 cup celery leaves
  • 1/4 cup salted roasted almonds, chopped
  • 1 lb king oyster mushrooms, sliced lengthwise 1/4 inch thick
  • 2 cups (12oz) green grapes
  • 2 heads butter lettuce, leaves separated
  • 2 cups very thinly sliced celery
In a small bowl, whisk the vinegar with the lemon juice, celery seeds, mustard and half of the garlic. Gradually whisk in 1/4 cup of the olive oil and the almond oil until emulsified. Season the dressing with salt and pepper.

In a food processor, combine the remaining garlic with the parsley, celery leaves and almonds and pulse until finely chopped. Add another 1/4 cup of the olive oil and puree to a chunky paste. Season the pesto with salt and pepper.

Light a grill (or heat your broiler). Brush the mushrooms with oil and season with salt and pepper. Grill over high heat, turning once, until tender and browned, about 5min. In a bowl, toss the grapes with the remaining 1 Tbs of olive oil and season with salt and pepper. Grill over high heat until the skins begin to blacken in spots, about 3min; line the grill with perforated foil if the grapes will fall through. Transfer the grapes and mushrooms to a large bowl and toss with the pesto.

Arrange the lettuce leaves on a platter and drizzle with half of the dressing. Spoon the mushroom-and-grape salad onto the lettuce. Toss the celery with the remaining dressing, spoon it on top and serve.

Sunday, June 19, 2011

I Hate Ice Cream.

There, do I have your attention now?

Ok, so it's not entirely true. It's not ice cream itself that I hate; it's the recipes that annoy me. Or, more specifically, the need for extra, unwieldy equipment that I don't have. I've lost count of the number of interesting flavours I've come across, only to be foiled by that last accursed step: "Churn in ice cream maker according to manufacturer's instructions." Argh! Couldn't you have told me that, I don't know, before I carefully reviewed the ingredients list and examined the other steps to ensure they were feasible. Or before I visualized spending a hot summer afternoon cooling off by having delicious ice cream and drinks while lounging on the roof of my building?

Yes, Falko, I'm talking to you. Why must you taunt me so with your divine-looking experiments? Your obsession is a bane to my culinary existence. I will be coming to your door soon, and you will rue the years of twarted anticipation you have caused me! Do you hear me? RUUUUUUE!

For all {Humans} \ {Falko}, this dear friend of mine is a frequent contributor to Serious Eats, and you should give serious thought to reading all his contributions. But I warn you: get an ice cream maker first. Otherwise, you'll be prone to outbursts like the above.

Ok, rant over. The reason I bring up this subject is -- as a result of somebody's quests into ice cream creation -- I have long wanted to find homemade ice cream alternatives that don't require any special equipment. Unfortunately, a lot of scoopable/hand-held frozen desserts are lost if you can neither a) churn the mixture, nor b) mold it. The good news is that the weather in Chicago is finally warming up -- for instance, the net increase in temperature this past week has been around 40 degrees (50 degrees 3 days ago, 90 degrees today). That isn't great in and of itself, but it does mean that the various foodie magazines I read have adopted a focus on cool desserts.

Like this one from Bon Appettit, a Mango-Chile Ice. The ingredient list caught my eye immediately; there are so few, yet each offers a distinctly noticeable influence on the finished dish: ripe mangoes for their fruity sweetness, lime for the acidic citrus tang, topped with red pepper to give it a memorable afterburn. In fact, I happily added a lot more lime zest and red pepper than was called for, and I never regretted it for an instant. The preparation time sucks, though: you have to crush and refreeze it three times, and be sure not to forget it in the freezer, lest you have to deal with a solid plate of ice, rather than gradually hardening slush. More research is definitely required on that front. But the taste of this dessert is the perfect thing for the soon-to-be sweltering summer days: cool and refreshing, with a bite that will keep your attention.

Mango-Chile Ice
  • 6 large mangoes (about 5,1/3 lb) halved, pitted, peeled, diced (about 7,1/2 cups)
  • 1,3/4 cups sugar
  • 1/2 cup fresh lime juice
  • 2 tsp lime zest
  • 1/4 tsp ancho chile powder, plus more for serving
Set a strainer in a 13*9*2-inch glass baking dish. Combine half of all ingredients with 5 Tbsp water in a processor and purée until smooth. Strain mango mixture into dish. Repeat for second half of ingredients. Freeze until mixture is slushy, about 2 hours.

Working in 2 batches, purée in processor again. Return mango ice to same dish. Freeze 2 hours.

Repeat 2 more times.

Serving suggestions: let stand at room temperature for 20min. Scoop into dishes, sprinkle with chile powder, and serve.

Wednesday, June 1, 2011

Hallelujah!

Supporting local food production, getting high quality ingredients, being challenged with new and unusual foodstuffs, learning what happens to the things you eventually put in your body... there are so many reasons to love farmer's markets, I don't think I could list them all if I tried. My local market just reopened from the winter hiatus. It's a little thing, hosting no more than a handful of stalls any given week, but compared to the goods at the grocery store ("America's Most European Supermarket!" - gag me) it's well worth the weekly pilgrimages to quality food. But since I would do my little market a great injustice by singing its praises insufficiently, I think I'm going to stop while I'm ahead. Instead, I'm going to talk about one thing about it that has me jumping up and down. And that thing is...

Meat.

Since moving to Chicago, I have encountered many interesting diets. Some are borne out of necessity (allergies, diabetes), and some of personal choice. With the exception of Zuckerberg's new diet, I can't think of any that are so overtly bizarre as to throw me for a loop. A little odd, sure. But friends who are vegetarian, vegan, kosher, allergic, or adherents to a particular culinary denomination are all welcome in my kitchen. In the meantime, however, I will remain happily omnivorous; I'll eat anything. Except licorice. Y'all can keep that shit to yourselves.

Moxie, on the other hand, is a locavore when it comes to meat. Make no mistake: she loves the stuff, but doesn't want to eat faceless-industry-processed muck. A fair opinion to have for an old farmhand. The issue is, what is local (and accessible) during a Chicago winter, when we live down in the south side? The answer: not much. Stray cat, maybe. Or the odd fattened rodent, if you care to catch it yourself (Zuckerberg?)

The result is that we've been eating mostly vegetarian during cold months. It hasn't been an issue: I have the odd meat dish when she's not around, and it's not difficult for either of us to get enough protein. But occasionally, that's not enough. There's a craving that arises. And sometimes, we heathen flesh-eaters - must - have - MEAT.

And now we can! Hallelujah and bless the farmer's market! To celebrate its reopening, we probably bought enough meat to last us a month, plus some other goodies (because, y'know, why not?). And to further mark the occasion, we planned to make a dish that I've been eyeing for a long time now -- to be precise, since I first got a copy of The Silver Palate, when Neen marked "Duck with Forty Cloves of Garlic" with 4.5 stars and the comment "use chicken!" Ultimately, we used two Cornish hens. Then joined forces with another apartment couple to have a spontaneous dinner party feast.

You may still be reeling from the title of this dish, in which case, further mention will probably throw you back into a frenzy. Yes, it actually does use 40 cloves of garlic. And it's delicious.

I'll wait for you to recover. Better? Good. 40 cloves of garlic! Blücher!

In all seriousness (hah), this dish deserves every bit of those 4.5 stars. Don't worry - since you roast the fowl with the cloves still in their skins, you won't be overwhelming the meat with a super-intense astringency. Instead, you enrich the moist bird with a faint je-ne-sais-quoi, giving it depth and flavour. The garlic is then added to the vinegary gravy, whose creaminess (coming from a stick of butter) is enough to tame it. As a whole, this recipe is a study in how to take disparate and pucker-worthy tastes and combine them to form a rich and satisfying meal. Definitely a celebratory meal.

"Duck" with Forty Cloves of Garlic
  • 1 duck, 4.5-5 lbs, fresh or thoroughly defrosted // or equivalent in other fowl
  • salt and freshly ground black pepper, to taste
  • 2 Tbs vegetable oil
  • 1 cup finely chopped yellow onions
  • 2 carrots, peeled and finely diced
  • 1,1/2 cups chicken stock or canned chicken broth
  • 1 tsp dried thyme
  • 3 parsley sprigs
  • 1 bay leaf
  • 40 large garlic cloves
  • 2 Tbs sherry vinegar
  • 1 Tbs Crème de Cassis (black currant liqueur) // I skipped this
  • 8 Tbs (1 stick) sweet butter, chilled
  • chopped parsley (garnish)
Remove neck and giblets from the duck; save the liver for another use. Chop neck, heart, and gizzard. Cut off wing tips. Remove all possible fat from the duck's cavity and prick the skin all over with a fork. Salt the inside and outside of the duck and set it in a shallow baking pan just large enough to hold it comfortably. Set aside.

Heat the vegetable oil in a small saucepan, add chopped giblets and wing tips, and brown over high heat. Season with salt and pepper, reduce heat, and add the onions and carrots. Cover and cook until vegetables are tender and lightly colored, about 20min.

Add the chicken stock, thyme, parsley and bay leaf, season with salt and pepper, and bring to a boil. Reduce heat, partially cover, and simmer while the duck roasts.

Preheat oven to 450 degrees.

Separate the heads of garlic into cloves, discarding the papery skin from the heads; do not peel the cloves. Select about 6 of the largest cloves and stuff them into the duck. Arrange the rest of the garlic around the duck.

Set the pan on the middle level of the oven. After 15min turn the temperature down to 375 degrees and roast the bird for another 35min for medium; 5 to 10 for juicy and still slightly pink. Transfer duck to a platter, cover with foil, and keep warm.

Strain the broth, discard the solids (aside: don't you dare. Keep them to make the gravy chunky later, or eat them as is), and measure the broth. You should have 1/2 cup. If you have less, don't worry. If you have more, return it to the saucepan and cook briskly for 5min or so to reduce it.

Lift the garlic cloves from the cooking fat with a slotted spoon and force them through the medium disc of a food mill. Reserve the puréed garlic and discard the skins.

When the broth is properly reduced, add the vinegar and Cassis, bring to a boil, and reduce the mixture by one third. Whisk in the garlic purée and remove the pan from the heat.

Cut the chilled butter into 10 pieces and whisk the butter, piece by piece, into the hot sauce, always adding another piece of butter before the previous one is entirely absorbed. The sauce will begin to look creamy and thicken slightly. Cover the saucepan and set it in a warm (not hot) place.

Carve the duck and divide the serving pieces among multiple plates. Spoon some sauce over the duck and transfer the rest to a sauceboat. Retrieve the garlic cloves remaining inside the carcass and use them to garnish the sauced duck. Sprinkle with parsley and serve immediately.

Sunday, May 8, 2011

OMG Bagels!

Dear Wednesday Chef: marry me. Adopt me. Take me in as your kitchen slave. In what manner can I laud and adore you for this wonder that you have brought into my life?

Ahem. Oh, hi there!

As you might recall, some time ago, I was discussing the merits of Chicago deep-dish pizza vs New York's thin crust. And, I admit, shamelessly poking fun at New Yorkers' quirky and intense pride. Yeah, sorry about that. I guess I'm still a little bitter from losing all my friends to that city (*shakes fist). So, to make amends, today I'm going to focus on one of NYC's great culinary accomplishments: bagels.

To tell the truth, I approached this with even more skepticism than I had the deep-dish. I simply wasn't convinced that you could actually make bagels in your home's kitchen. The chewy interior, the lightly-blistered crust, and don't you have to boil them for a while...? Sounds like something better left to industrial -- or at least specialized -- kitchens. Visions of disaster, of bloated, soppy dough loosely shaped into a torus, blossomed in my mind. It occurs to me that I must have once eaten such homemade "bagels" for the thoughts to be so vivid.

And then I found myself on The Wednesday Chef, a cooking blog by a New Yorker living in Berlin. Heh, a blog -- by an expat -- recommend -- by an expat -- to me (an ex-expat): expatriates FTW! That, plus the fact that she sounds like my sister in a good mood led me to take a liking to her recipes. And who could not take a liking to this: a recipe on how to make bagels from your own kitchen. I was caught when her initial skepticism mirrored my own, and then swept up in her rushed ebullience as the recipe culminated into The *Perfect* Bagels.

You don't believe it. I understand. *I* didn't believe it! Not even when I took their perfectly golden forms from the oven, nor when I cut through their crispy blistered skin, nor as I bit into their perfectly chewy interiors. I couldn't have made these! Impossible! Surely the kitchen gnomes must have surreptitiously replaced my dough with these god-touched bagels from heaven. And you know what? I don't care! As long as the gnomes do the same thing next weekend, when I'm making this recipe again. Twice. Maybe three times.

It's been a good morning.

I'm going to stop talking now, because you need to go make this right now.

Peter Reinhart's Bagels
as presented by Luisa Weiss, verbatim (yay plagiarism!) Makes 6 to 8 bagels
  • 3 1/2 cups (1 pound) unbleached flour (bread or all-purpose)
  • 3 teaspoons salt, divided
  • 3/4 teaspoon instant yeast
  • 1 tablespoon honey or barley malt syrup, if you've got it
  • 1 cup plus 2 tablespoons water
  • 1 teaspoon baking soda
  • Poppy or sesame seeds

By hand, mix the flour, 2 teaspoons salt, the yeast, honey and the water until the ingredients form a stiff, coarse ball of dough (about 3 minutes). If necessary, add a little more water. Let the dough rest 5 minutes.

Knead the dough on a lightly floured surface until the dough feels stiff yet supple, with a satiny, slightly tacky feel, 2 to 3 minutes. If the dough seems too soft or too tacky, sprinkle over just enough flour as needed.

Place the dough in a lightly oiled bowl, cover tightly with plastic wrap, and place it in the refrigerator for at least 1 hour and up to several hours. Keep in mind that the bagels must be shaped before proofing overnight.

When ready to shape the bagels, line a baking sheet with lightly greased parchment paper or a silicone baking mat.

Remove the dough from the refrigerator and divide it into 6 to 8 equal pieces. Form each piece into a loose, round ball by rolling it on a clean, dry work surface with a cupped hand; do not use any flour on the surface. If the dough slides around and won't ball up, wipe the work surface with a damp paper towel and try again - the slight amount of moisture will provide enough "bite" for the dough to form a ball. When each piece has been formed into a ball, you are ready to shape the bagels.

Using your hands and a fair amount of pressure, roll each dough ball into a "rope" 8 to 10 inches long. (Moisten the work surface with a damp paper towel, if necessary, to get the necessary bite or friction). Slightly taper the rope at the ends so that they are thinner than the middle. Place one end of the dough between your thumb and forefinger and wrap it around your hand until the ends overlap in your palm; they should overlap by about 2 inches. Squeeze the overlapping ends together and then press the joined ends into the work surface, rolling them back and forth a few times until they are completely sealed.

Remove the dough from your hand and squeeze as necessary to even out the thickness so that there is a 2-inch hole in the center. Place the bagel on the prepared sheet pan. Repeat with the other pieces. Lightly wipe the bagels with oil, cover with plastic wrap and place in the refrigerator overnight.

Remove the bagels from the refrigerator 90 minutes before you plan to bake them. Fill a large stockpot with 3 quarts of water (be sure the water is at least 4 inches deep), cover with a lid, and slowly bring the water to a boil. When it comes to a boil, add the remaining teaspoon of salt and 1 teaspoon of baking soda, reduce the heat and simmer with the lid on.

Thirty minutes before baking, heat the oven to 500 degrees.

Test the bagels by placing one in a bowl of cold water. If it sinks and doesn't float to the surface, return it to the sheet, wait 15 minutes and then test it again. When one bagel passes the float test, they are ready for the pot.

Gently lift each bagel and drop it into the simmering water. Add as many as will comfortably fit in the pot. After 1 minute, use a slotted spoon to flip each bagel over. Poach for an extra 30 seconds. Using the slotted spoon, remove each bagel and return it to the lined baking sheet. Continue until all the bagels have been poached. Generously sprinkle each bagel with a topping.

Place the baking sheet in the oven and reduce the heat to 450 degrees. Bake for 8 minutes and then rotate the sheet (if using two sheets, also switch their positions). Check the underside of the bagels. If they are getting too dark, place another sheet under the baking sheet. Bake until the bagels are golden brown, an additional 8 to 12 minutes. Remove from the oven and transfer the bagels to a rack for at least 30 minutes before serving.

Monday, April 25, 2011

Happy Birfday to Me!

Black Forest Cake
for the cake:
  • 1,2/3 cups flour
  • 1,1/2 tsp baking powder
  • 1/4 tsp salt
  • 5oz bittersweet chocolate, chopped
  • 1/2 cup water
  • 1/2 cup butter, softened
  • 1,1/4 cups brown sugar
  • 2 eggs
  • 1/2 cup sour cream
for the filling:
  • 1,1/2 cups cherry jam or preserves
  • 3 Tbs kirsch
  • 2 cups heavy cream
for the frosting:
  • 8 oz bittersweet chocolate, chopped
  • 2 Tbs butter
  • (optional) candied cherries to decorate

Bake the cakes
Preheat the oven to 350 degrees. Butter 2 9-inch round cake pans, then line them with parchment paper, and butter the parchment paper.

Mix the flour, baking powder, and salt in a large bowl. Melt the chocolate and water in a double boiler over barely simmering water. Set aside to cool.

Beat the butter and brown sugar in a large bowl with an electric mixer at medium speed until creamy. Add the eggs, one at a time, beating until just blended after each addition. With mixer at low speed, gradually beat in the chocolate mixture, sour cream, and dry ingredients.

Spoon half the batter in each of the prepared pans. Bake until a toothpick inserted into the centers comes out clean, 45-55min. Cool the cakes in the pans for 10min. Turn out onto racks. Carefully remove the parchment paper and let cool completely. Split the cakes horizontally.

Make the Cherry Cream Filling
Mix the jam and kirsch. With mixer at high speed, beat the cream in a medium bowl until stiff.

Make the Chocolate Frosting
Melt the chocolate and butter in a double boiler over barely simmering water.

Assemble the Cake
Place on cake layer on a serving plate. Spread with one-third of the preserves mixture and one-third of the whipped cream. Repeat with the remaining cake layers, finishing with a plain layer. Spread the frosting over the top and sides of the cake.

Oh yeah, and assemble a large tapas dinner while you're at it.

Sunday, April 10, 2011

No Heat Required

Let's make one thing clear here: I'm a pasta addict. Sure, it's cheap and easy, thereby making it the kind of food off of which we graduate students base our existence. What's more, a good sauce provides the longest-lasting leftovers. I can think back to several periods in my collegiate life when all I had time to eat was Norma's Peanut Sauce. But I find that the real beauty of the food is that it acts as a base for just about anything. It offers a firm grounding for any inspired madman to create a sauce ridiculous and amazing. And as a result, I eat it all the time.

So when Moxie mentioned she wanted to make her mum's recipe for her favourite uncooked sauce, I was game to try it. I have witnessed others try to half-ass an uncooked sauce -- mainly by tossing on some oil, cheese, and calling it done -- and this is most definitely not that. This sauce relies on a collection of strong, distinct flavours: anchovies, olives, garlic, capers, etc. The blended result is amazing: potent, but not overwhelming, and easily diluted/focused by the addition/removal of more noodles. The taste lingers in your mouth without ever becoming abrasive, just leaving you craving more. Of all the sauces that I've experimented with, this is currently the most memorable. And what's more: it's really pretty! Not bad for a meal that takes no more than a few minutes of chopping & mincing to prepare.

Pasta with Uncooked Sauce
  • 4 large tomatoes, chopped
  • 1/4 cup fresh parsley, chopped
  • 14 large black olives //Kalamata recommended
  • 3 Tbsp capers, minced
  • 4 anchovy fillets, chopped
  • 2 Tbsp olive oil
  • 3 large garlic cloves, minced
  • 1/2 tsp fresh ground black pepper
  • 1/4 cup Parmesan cheese //or more, to taste

Mix all of the ingredients in a large bowl. Cook angel hair pasta until done. Drain and toss with uncooked sauce. Serve immediately. Sprinkle additional Parmesan cheese over pasta to taste.

This amount of sauce is good for approximately ½ lb of pasta

Sunday, March 27, 2011

Raspberry Rolls

When it comes to baking breakfast pastries, I ascribe to the French method. That is: lots and lots of butter. Unfortunately, in this country, the emphasis seems to be on sugar instead. After all, we do live in the land of Krispy Kremes and Twinkies, not croissants and pain-au-raisins. Guys, when you have popular myths about how your pastries can survive nuclear holocausts, you're doing something wrong!

All this to say, I know I shouldn't be encouraging this type of behaviour. But I have learned that such pastries as cinnamon buns (with less sugar and more cinnamon) are passable breakfast material. And when I found this recipe, that disregards the granulated, spicy filling for the sake of berries, I couldn't resist the temptation. Besides, it was getting on to exam week, and my roommates were in sore need of a sweetness boost in the morning.

It's pleasant to make from the cook's perspective, because you don't have to wake up at the crack of dawn in order to have it ready by breakfast-time. Instead, you can prepare everything the night before, leave it in the fridge overnight, and pop it in the oven when you wake up. Mixed feelings on the taste: though it's much better than many breakfast pastries out there, I would still trade more sugar for butter. The raspberries provide enough fructose by themselves. But I am opinionated this was, and the final product was universally appreciated, so I figured I should share it anyway.

Raspberry-Swirl Sweet Rolls
for the dough:
  • 1 cup milk
  • 2/3 cup sugar
  • 1,1/2 Tbs active dry yeast
  • 1 stick unsalted butter, softened
  • 2 large eggs
  • 1 tsp finely grated lemon zest
  • 1/2 tsp fine sea salt
  • 4,1/4 cups flour, plus more for dusting
for the filling
  • 10 oz frozen raspberries // they recommend Individually Quick Frozen, but regular's good enough for me
  • 1/4 cup plus 2 Tbs sugar
  • 1 tsp cornstarch
for the glaze
  • 3/4 cup confectioners' sugar
  • 3 Tbs butter, melted
  • 1,1/2 Tbs heavy cream

Make the dough
In a small saucepan, warm the milk over moderately low heat until it's about 95 degrees. Pour the warm milk into the bowl of a standing electric mixer fitted with the dough hook and stir in the sugar and yeast. Let stand until the yeast is foamy, about 5min. Add the softened butter, eggs, grated lemon zest and sea salt. Add the flour and beat at medium speed until a soft dough forms, about 3min. Increase the speed to medium-high and beat until the dough is soft and supple, about 10min longer.

Scrape the dough out onto a lightly floured surface and knead it with your hands 2 or 3 times. Form the dough into a ball and transfer it to a lightly buttered bowl. Cover the dough with plastic wrap and let stand in a warm place until doubled in bulk, 1-2 hours.

Line the bottom of a 9-by-13-inch baking pan with parchment paper, allowing the paper to extend up the short sides. butter the paper and sides of the pan. Turn the dough out onto a lightly floured work surface and, using a rolling pin, roll it into a 10-by-24-inch rectangle.


Add the filling
In a medium bowl, toss the frozen strawberries with the sugar and cornstarch. Spread the raspberry filling evenly over the dough. Tightly roll up the dough to form a 24-inch-long log. Working quickly, cut the log into quarters. Cut each quarter into 4 slices and arrange them in the baking pan, cut sides up. Scrape any berries and juice from the work surface into the baking pan between the rolls. Cover the rolls and let them rise in a warm place until they are puffy and have filled the baking pan, about 2hrs.

If you're making this the night before, stop here. Cover the rolls and place them in the refrigerator. In the morning, return them to room temperature before baking.

Preheat the oven to 425 degrees. Bake the rolls for about 25min, until they are golden and the berries are bubbling. Transfer the pan to a rack to cool for 30min.

Make the glaze
Meanwhile, in a small bowl, whisk the confectioners' sugar with the butter and heavy cream until the glaze is thick and spreadable.

Invert the rolls onto the rack and peel off the parchment paper. Invert the rolls onto a platter. Dollop glaze over each roll and spread with an offset spatula. Serve warm or at room temperature.

Thursday, March 10, 2011

Asian Fusion Weekend

This past weekend witnessed a host of continual successes in my kitchen. It seems that everything we made, be they desserts, breakfast, or actual main courses, ended up perfect. In addition to this excellence, it appears that we also had an unplanned theme of vaguely pan-Asian-ish flavours in our dinners. That probably had something to do with the abundance of teriyaki and soy sauce in use. Y'know, just maybe. In any case, both these dishes do a wonderful job of pairing distinct sweet and sour flavours together. They were such an unexpected treat, I can't help but blog about them.


Saturday: Teriyaki-Glazed Salmon Fillets
I don't eat enough fish in my life. This is because a) as a scuba dive instructor, I find it somewhat odd to eat my little aquatic friends, and more saliently, b) the price tag of fish in the Midwest doesn't like me. But when you get a craving, there's no fighting it. I needs me some fishies. So, bolstered by the earlier success of revisiting old cookbooks, I took another leap of faith and started examining the fish section ATK's 2009 Cooking for Two. I don't rely on this one much, because "for Two" doesn't generate sufficient leftovers in my opinion. The food is good, though, so there's no sense in completely ignoring it.

This dish stood out from the rest in the section. It involves pan-searing salmon until it's almost crisp, and then covering it in a thick, viscous glaze of homemade teriyaki sauce (because bottled just isn't good enough). What's more, the recipe leads you to serve it on a bed of simple cabbage-shiitake stir-fry. Though I would add more mushrooms next time, this is a quick way to add both the crunch of veggies and the je-ne-sais-quoi of shrooms to the already sweet-salty tang of the fish. Talk about rich in taste and texture! ATK FTW. And simple enough that even I might decide to assemble it on a weeknight. When I can afford salmon on a regular basis. Yeeaaah...

  • 1/4 cup soy sauce
  • 1/4 cup sugar
  • 1 Tbs mirin
  • 1 tsp cornstarch
  • 2 scallions, sliced thin
  • 2 garlic cloves, minced
  • 1 tsp sesame oil
  • 1/2 tsp grated or minced fresh ginger
  • 4 tsp vegetable oil
  • 6 oz shiitake mushrooms, stemmed and sliced 1/4 inch thick
  • 1/2 small head napa cabbage (about 8oz), cored and cut into 1-inch pieces (about 4 cups)
  • salt and pepper
  • 2 (6oz) skinless center-cut salmon fillets, about 1,1/2 inches thick

Adjust an oven rack to the middle position and heat the oven to 200 degrees. Whisk the soy sauce, sugar, mirin, and cornstarch together in a small bowl. In a separate bowl, combine the scallions, garlic, sesame oil, and ginger.

Heat 1 Tbs of the vegetable oil in a 12-inch nonstick skillet over medium-high heat until shimmering. Add the mushrooms and cook until they soften and just begin to brown, about 2min. Stir in the cabbage and cook until wilted, about 5min.

Clear the center of the skillet, add the scallion mixture, and cook, mashing the mixture into the pan, until fragrant, about 30sec. Stir the scallion mixture into the vegetables. Season with salt and pepper to taste, and transfer the mixture to a platter. Tent loosely with foil and keep warm in the oven while preparing the salmon.

Pat the salmon dry with paper towels and season with salt and pepper. Wipe out the skillet with a wad of paper towels, add the remaining 1 tsp oil, and heat over medium-high heat until just smoking. Place the salmon, skinned-side up, in the skillet and cook until well browned on the first side, about 5min. Flip the fish and continue to cook until the flesh is opaque and flakes apart when gently prodded with a paring knife, 3-5min longer. Transfer the fish to the platter with the cabbage in the oven while preparing the sauce.

Wipe out the skillet with a wad of paper towels. Whisk the soy sauce mixture to recombine, add it to the skillet, and bring to a simmer over medium ehat. Cook until the sauce is a thick, syrupy glaze, about 2min. Spoon the glaze over the salmon and serve.


Sunday: Honey-Chile Chicken Wings
This recipe has been on my waiting queue for a while: Moxie and I had been planning to wait until the local farmer's market reopens to purchase quality meat. Unfortunately, we've both been suffering from meat-cravings recently, so we caved and bought the best free-range chicken the supermarket could provide (which isn't so much "happy" chicken as "vaguely content"). But man, does it hit the spot.

My first reaction to biting into the finished product was: "...buffalo wings?" Because indeed, they are similar to the restaurant appetizer that Do wants to order by the bucketful whenever he comes to visit. They have the same crispy skin and juicy interior; both are doused in sauce; finally, eating them with your hands makes a tasty mess that will leave you licking your fingers for hours. The sauce itself is what makes all the difference; I'm sure you can imagine the depths of taste in the combination of vinegar, honey, and soy sauce. Adjust the spice content to match your heat tolerance (Do, for instance, would triple the amount of crushed red pepper, and then add some hot sauce), and you can add the right amount of burn to the sticky sweet & salty mixture.

  • 4 lbs chicken wings // You don't need that much; we used less than 3 lb
  • 1/4 cup olive oil
  • salt and pepper
  • 1/4 cup rice vinegar
  • 1 tsp crushed red pepper
  • 1/2 cup honey
  • 2 Tbs soy sauce
  • 2 scallions, thinly sliced

Preheat the broiler and set a rack in the center of the oven. In a large bowl, toss the chicken wings with the olive oil and season with salt and pepper. Arrange the wings on a wire rack set over a large, sturdy baking sheet. Broil for 45-50min, turning once or twice, until the wings are cooked through and crisp.

Meanwhile, in a small saucepan, combine the vinegar and crushed red pepper and simmer for 1min. Let cool, then whisk in the honey and soy sauce.

In a large bowl, carefully toss the chicken wings with the honey-soy mixture. Transfer the wings to a platter, sprinkle with the scallions and serve.